The MAEKAN Classroom is a series created by the MAEKAN team to pass on the skills we’ve learned in the past few years. We don’t plan to wait until we have a “masterclass” or spent decades honing our craft to share experience and knowledge that works. We want to help get self-taught creatives started telling and publishing their stories today.
Now that you’ve collected all the recorded audio you need to create yourself, what’s next? The post production process is sometimes the most challenging part of the whole storytelling process. How do you make sense of what you’ve just captured and how do you put it in a way that represents your thoughts and tells the story you planned out at the very beginning?
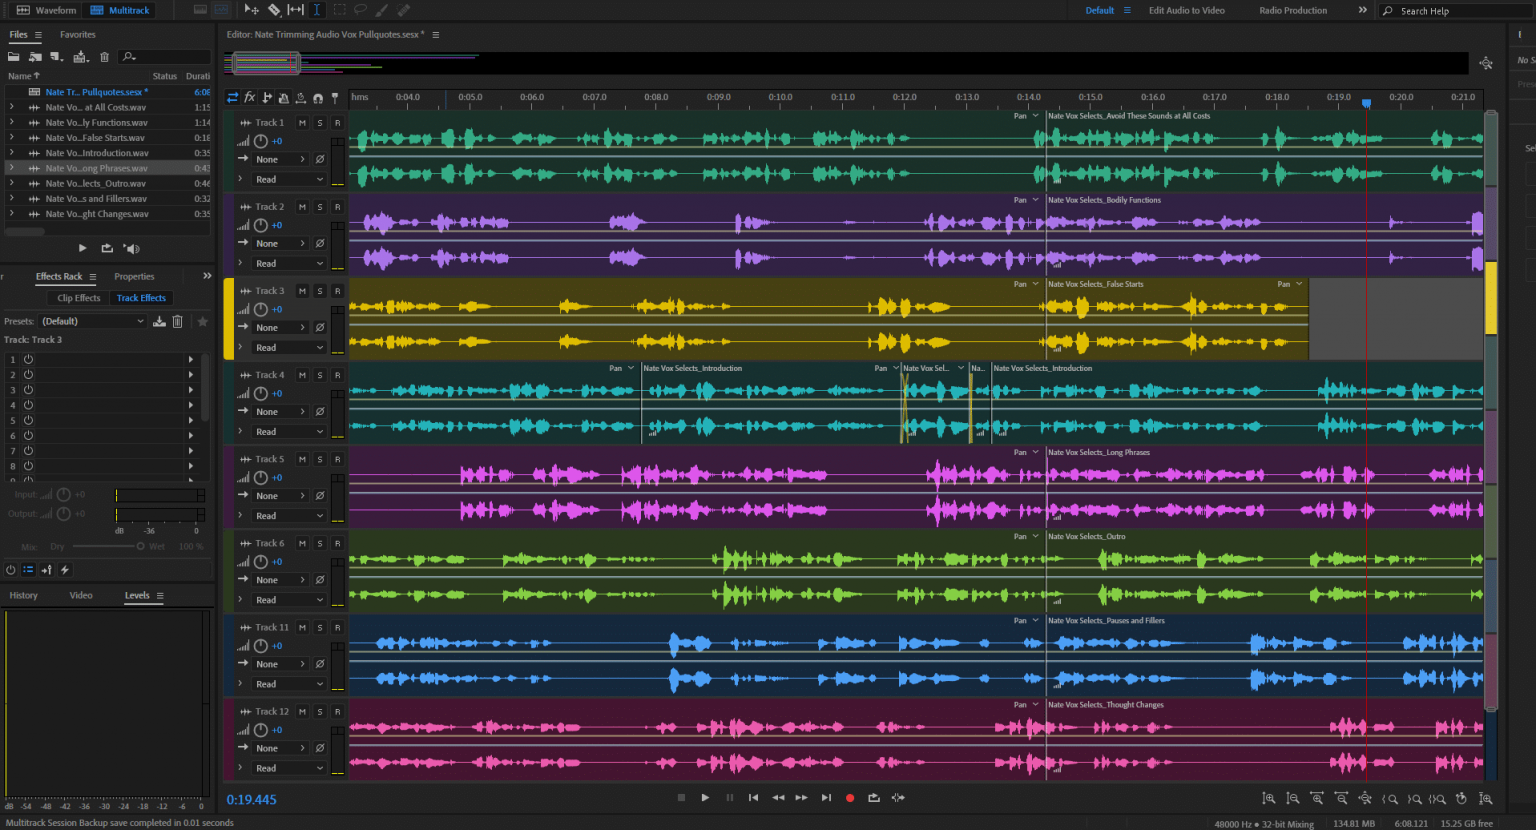
Audio selections from a longer recording laid out on separate tracks for trimming. This is a situation where you should *not* edit through all tracks. In this case, an intentional edit on track #1 has become unintentional edits across most of the other selections (represented by that big grey line running top to bottom).
Fundamentals
• The more complex your recordings are, the more organized you’ll have to be.
• Depending on your project, you can “listen and pull” selected audio or you can just “listen and cut” the entire recording and decide after.
• The goal of trimming audio is to remove unwanted sounds and shorten the length of the recording, while making speakers sound naturally more articulate.
• Where trimming focuses on removing complete sounds such as mistakes, stutters and pauses, treatment with equalization, compression and other digital tools removes sounds at the frequency level.
• Throughout the workflow, any newly exported assets should be at the highest quality possible while the final exported product can be more heavily compressed.
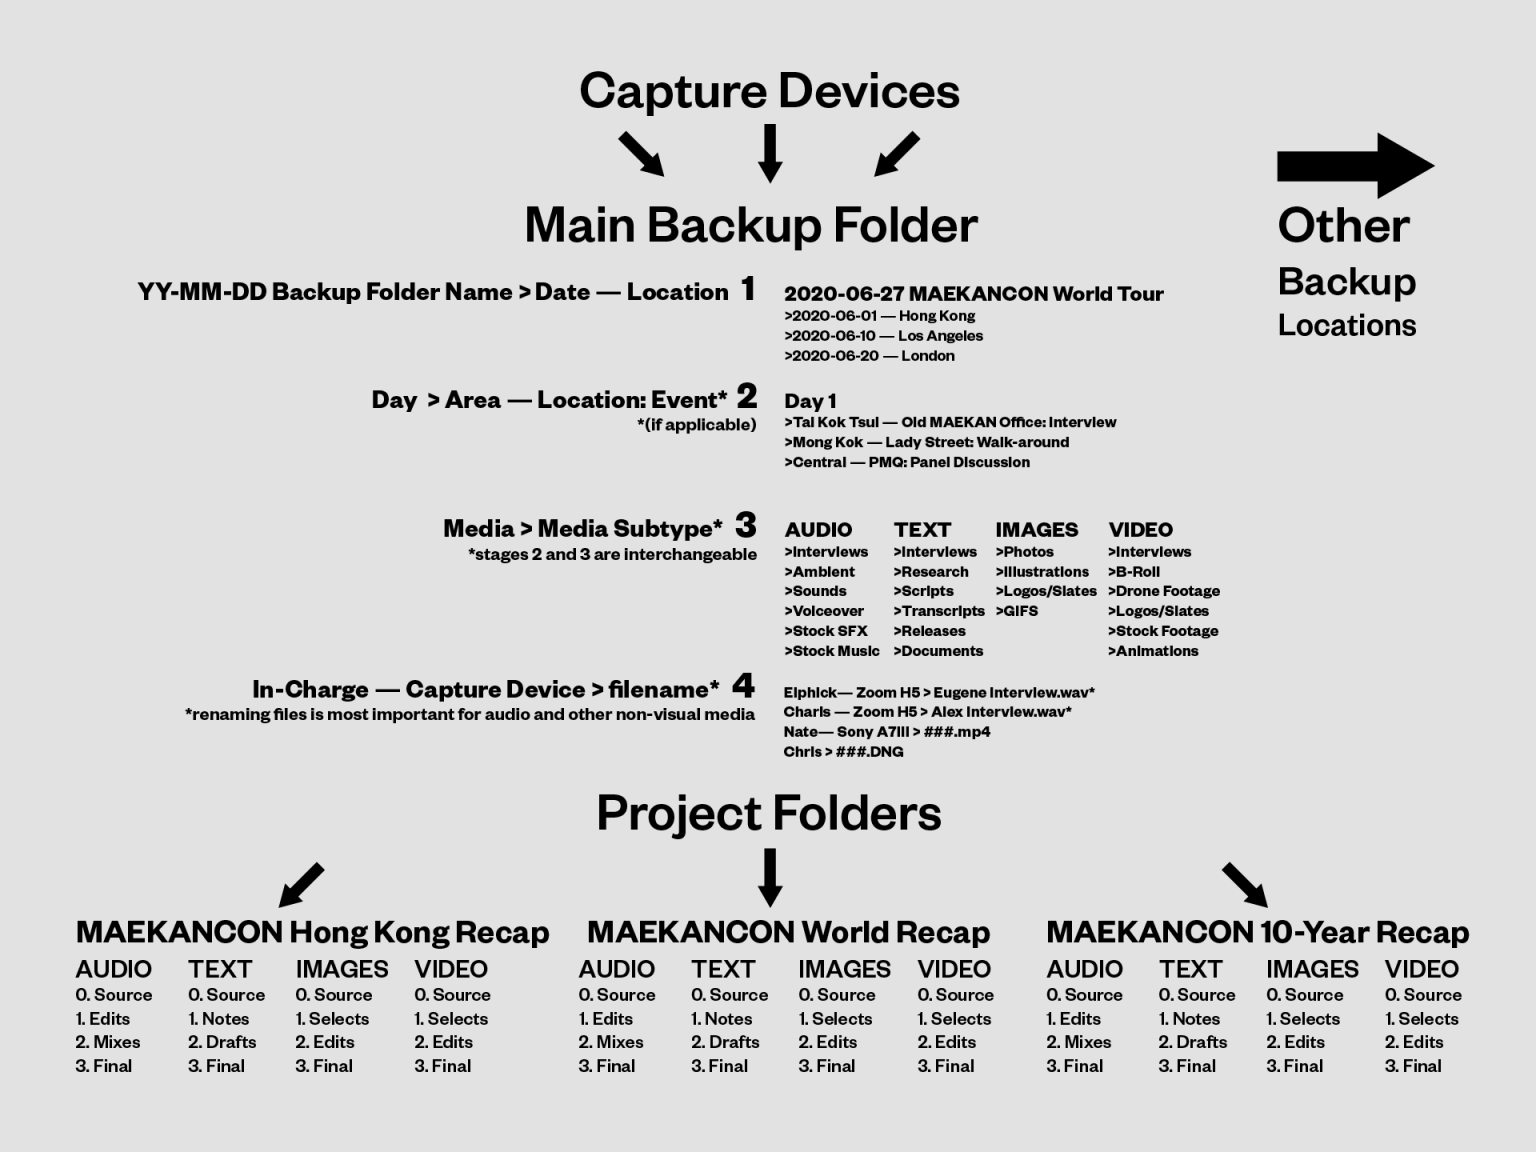
*folder structure for a fictitious multi-day event. Once backed-up, source files are always copied to new folders, never moved.
Get Organized
Now that you’ve captured all your audio, it’s time to get organized by backing up and sorting your files. The chart above outlines how we make permanent back-ups of all the different media types for a given project to a single folder (which is synced to Box), and then make copies for any projects that will use those assets. This is to avoid inadvertently modifying or deleting any original copies.
When working with audio files, we can’t stress enough how important it is to label your files since unlike images or video, you can’t tell what your file is by a quick glance at a thumbnail. Sometimes, it’s easier to tell your files apart if they’re longer or larger, but if you’ve captured a lot of files, you might consider organizing them first in Folders by the capture time and location. As the chart demonstrates, you can add more descriptors/variables to distinguish files as your recording needs get more complex. In the case that say, more than one person is using the same recording device, you can include their name in the folder.
To help illustrate the workflow, this is a raw and completely unedited recording by Nate (complete with mistakes, retakes and other types of awkwardness) to demonstrate a less than ideal capture but in a controlled environment.
Example: Untrimmed, Untreated Capture
Trimming Audio
Trimming audio simply means cleaning up and cutting away the excess noises, hiccups and other undesirable sounds you don’t want in your final audio recording. This section is concerned with cleaning up human speech. No matter what program you use to trim, your goal will be the same and that is to shorten the overall length of the recording and make all the speakers sound much more articulate than they likely were when they recorded. This means cutting out needlessly long pauses, fillers and other sounds, while arranging the remaining pieces to be coherent and natural.
- Adjusting Amplitude: Assuming you captured your audio without peaking, now would be a good time to amplify it before you start cutting it apart. Aside from making sections of your audio more visually distinct to help you navigate it, this can help you pick up noises that you might not have been able to hear before.
Video Timestamps: Audition (0:26), Audacity (0:56) - Identifying Selects: If you happen to have hours of recording and know you won’t have time to trim all of it, you may consider speeding through a longer clip and identifying only certain parts to use. This process could be even faster if you took notes on the day you recorded. One good reason to simply label stretches of audio and then only save those is because depending on your software, your markers may shift if you make edits to the original track you labeled (such as if you shorten it). This could make your reference points useless, so to save yourself some headaches, it might be best to just label and export selections of the original track.
Video Timestamps: Audition (1:13), Audacity (2:18) - Exporting Selects: One good reason to simply label stretches of audio and then only save those is because depending on your software, your markers may shift if you make edits to the original track you labeled (such as if you shorten it). This could make your reference points useless, so to save yourself some headaches, it might be best to just label and export selections of the original track as opposed to modifying it. If you’re cutting a full podcast or discussion, you can skip this step.
Video Timestamps: Audition (1:56), Audacity (2:42) - Re-Importing Selects: If you’re cutting a full podcast or discussion, you can skip this step. For this part, you can choose to position all of your selects on one track and edit the whole thing or place them on separate tracks and work down the list.
Video Timestamps: Audition (3:09) - Trimming Single Tracks: There are many ways to trim unwanted audio, but regardless, you’ll be splitting clips (which cuts clips at a given point) and ripple deleting (simultaneously deleting audio and closing the gap left by that deletion) a lot, so be sure to learn the hotkeys of the software you’re using.If none of these techniques create a smooth edit you can hear, you will need to use some kind of crossfade (which tapers the start and end points of two clips) to make a seamless transition.
Video Timestamps: Audition (3:44), Audacity (5:35) - Trimming Multiple Tracks: For editing synchronized audio from several speakers such as in a discussion, you’ll have to make sure your edits apply to all of the tracks, especially edits that shift time (like ripple deletes). If not, you may end up with audio that is out of sync, which can be a nightmare to fix.
Video Timestamps: Audition (4:46), Audacity (6:32) - Exporting: After all your hard work, you should re-export the trimmed audio as a new WAV. file so that any future work is working with a new refined piece of audio. To recap: by this point you’ll have two complete files—your original unmodified one and one that’s trimmed and shorter.
Now that we’ve removed most of the problem elements from the recording, we now have a piece of audio that’s been trimmed down from over seven minutes to just over two and a half. These edits included not only mistakes, but also material that couldn’t be salvaged (made to sound natural) and other material that wasn’t deemed necessary.
Example: Trimmed, Untreated Capture
Vocal Treatment
Regardless of what program you end up using to trim and then treat your vocals, they will all involve a lot of similar tools processes. Here are the basic ones you’ll be using to enhance the presence of your recordings.
- Importing: The first step is to start a new project with your new trimmed audio files.
Video Timestamp: Ableton (0:17) - Equalization (EQ): Equalization just means you’re adjusting the loudness of certain frequencies (particularly the ones you want or like) and reducing the loudness of unnecessary or undesirable ones.
Video Timestamp: Ableton (0:43) - Compression: Compression refers to reducing the dynamic range of an audio recording (the range in volumes between the loudest and quietest parts) for a more even sound in terms of volume.
Video Timestamp: Ableton (1:39) - De-Essing: De-essing is meant to compensate for any harsh hisses and ess sounds in speech (known as ‘sibilants’) by isolating those frequencies and excluding them.
Video Timestamp: Ableton (2:31) - De-Noise: Now that the audio has been enhanced overall, it may have revealed some previously unnoticeable sounds that may now be undesirable. A final de-noise removes any of these newly amplified noises. This can also be done at the beginning if the recording environment is particularly poor.
Video Timestamp: Ableton (2:55) - Bus Compressor (for Multiple Speakers): Like the first compressor, this one is designed to flatten the peaks (the loudest parts) of the audio signal. Among many other uses, a bus compressor for our needs for now is to align the volumes of different voices speaking in the same context, such as in a discussion.
Video Timestamp: Ableton (3:20) - Export: Once treated, export your audio once again. You now have a highly refined voice recording(s) to layout and arrange with other audio elements to create your story.
Video Timestamp: Ableton (3:34)
After these steps are finished, we’ve both polished out any other impurities we want to exclude from our recording and brought out more from the original voice.
Example: Trimmed, Treated Capture
Key Takeaways
To sum up, your goal at this phase is to:
• Organize your audio recordings
• Either select parts of your recording that you’ll use or get your full-length recording ready for trimming.
• Delete unwanted parts of your audio and reconnect any gaps (with or without crossfading) so that everything sounds natural.
• Use EQ, compression, de-essers and de-noisers to enhance and re-shape your recordings while removing any constant background noises.
• Create high-quality exports at each stage of your workflow so that you can easily revisit any steps as needed.
In our next and final episode of this series, we’ll cover how to put your show together and then get it out there for your audience to hear!
All Sections
Part 6 — Publishing & Promotion
If you have any questions or feedback on this episode or series, drop us a line at info@maekan.com.


